
NEWS
New Products


Sphere LED Display Installation & Maintenance Full Guide
2025-07-101. Sphere LED display Introduction
The Sphere LED display is an innovative type of display device. Thanks to its distinctive shape and flexible installation methods, coupled with its unique design and excellent display performance, it makes information transmission more vivid and intuitive. With its unique shape and remarkable advertising effectiveness, it has been widely applied in various venues, commercial centers, and other places. This article will elaborate on how to install and maintain the LED sphere display.

2. How to install your sphere LED display?
2.1 Preparation before installation
2.1.1 Site inspection
Before installing the spherical LED display, carefully assess the intended installation site. Verify that the space dimensions and layout are suitable for the setup, ensuring sufficient clearance for the LED sphere post-installation without obstruction from surrounding objects.
Measure the ceiling height and check the distance between walls or other obstacles and the planned installation position.
Inspect the power supply at the installation location. Confirm its stability and ensure the voltage and current specifications align with the sphere LED display’s power requirements.
2.1.2 Material preparation
Prepare all components of the spherical LED display, including the spherical frame, cabinets,flexible modules, control system, power supply equipment, and various connecting wires. During the preparation process, it is necessary to check whether these components are intact and whether their models are compatible with each other. Additionally, based on the actual installation requirements, prepare the corresponding installation tools, such as screwdrivers, wrenches, electric drills, and other common tools, as well as expansion screws, bolts, nuts, gaskets, and other auxiliary installation materials.
2.1.3 Safety guarantee
Installation personnel must wear appropriate personal protective equipment (PPE), including safety helmets, harnesses, and other necessary gear, to ensure their safety throughout the process.Additionally, clear warning signs should be placed around the work area to restrict unauthorized access and prevent potential accidents.


2.2 Installation steps
2.2.1 Fixing the sphere frame
Select an appropriate installation method based on on-site conditions and the size of the sphere; common methods include wall mounting, hoisting, and column mounting.
Wall mounting
First, install a fixed bracket on the wall, then securely fasten the spherical frame to the bracket.
Hoisting
Install a hook or hanger on the ceiling, then suspend the sphere using suitable ropes or similar means. Pay close attention to ensuring the stability of the suspension.
Column mounting
First, install the base, then fix the sphere onto the column. When securing the spherical frame, use connectors such as expansion screws and bolts to firmly attach it to the installation position, ensuring the sphere will not shake or fall during subsequent use. Meanwhile, it is crucial to strictly guarantee the installation accuracy of the sphere in both horizontal and vertical directions.

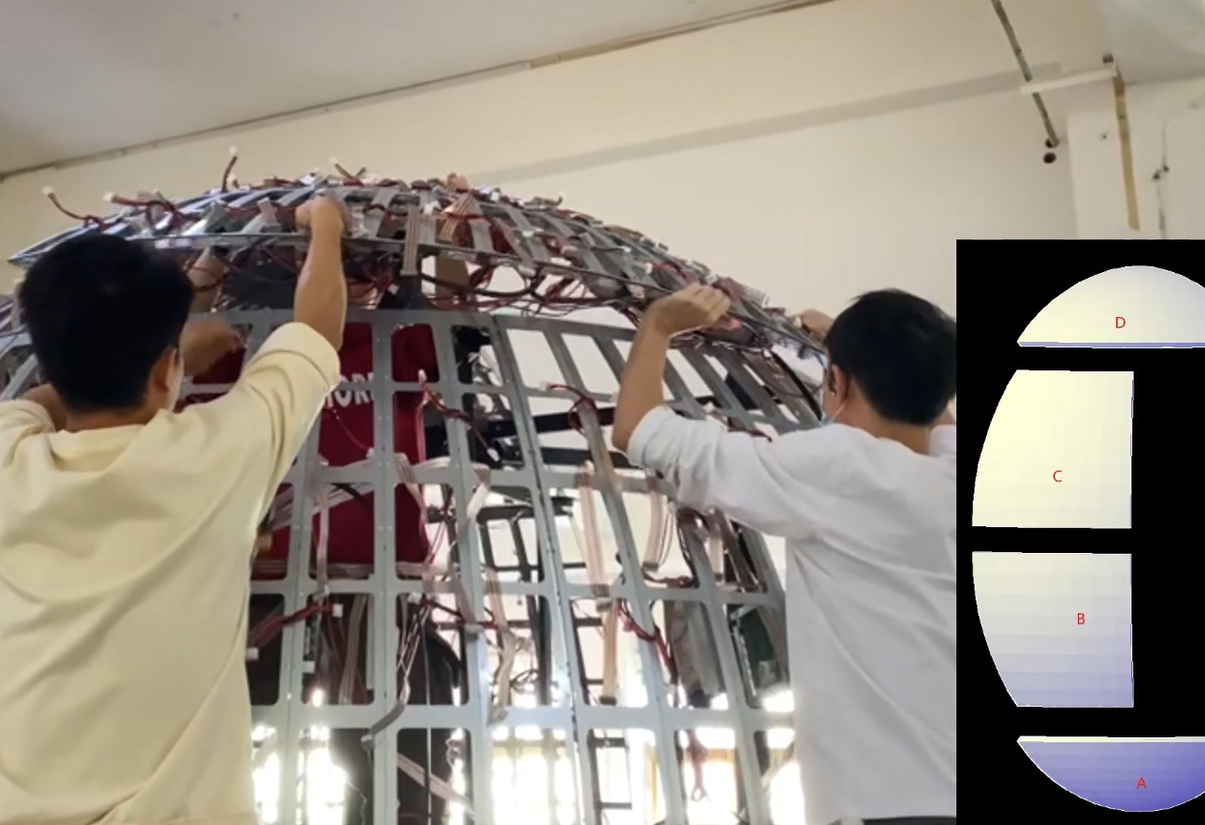
2.2.2 Installing the flexible LED display module
Flexible module Installation
Install the LED display modules onto the sphere frame sequentially in accordance with the design specifications.
During installation, pay close attention to the tightness of the inter-module splicing to ensure seamless connections, guaranteeing a continuous and complete display image.
Wiring Connection
After installation, connect each LED display module using the designated connection wires.
Ensure the wiring method and connection sequence are correct to prevent display malfunctions due to improper connections.
Properly secure and protect the connection wires to avoid damage or disconnection caused by external forces during operation.
.

2.2.3 Connecting the control system and power supply
Connect the control system to the LED display modules to ensure stable and accurate signal transmission. The control system should be installed in a location that facilitates operation and maintenance, with appropriate protective measures in place to shield it from external interference that could disrupt its normal operation.
Next, connect the power supply equipment to the spherical display to provide stable power support. When making the power connection, pay special attention to the correct alignment of the positive and negative poles, as reversing them may cause damage to the display. After completing the connections, arrange and secure the power lines properly to prevent potential safety hazards such as electric leakage.
2.2.4 Debugging and testing
After completing the installation, perform a comprehensive debugging and testing process for the spherical display screen. Follow these steps:
Hardware Inspection
Verify that all hardware connections are secure, ensuring proper fastening between components.
Check for unobstructed signal and power lines.
Power-On and System Activation
Switch on the power supply and control system.
Evaluate the display performance, focusing on:
Image clarity
Color accuracy
Brightness uniformity
Troubleshooting
If any issues are detected, promptly diagnose and resolve them to ensure optimal display functionality.
2.3 Post-installation acceptance
a. Carry out a rigorous acceptance check on the overall installation quality of the spherical LED display. Focus primarily on verifying whether the sphere is securely fixed, whether the installation effect of the display modules meets the requirements, and whether the control system and power supply are functioning normally. Ensure that the installation of the spherical LED display fully complies with the design requirements and relevant standard specifications.
b. Conduct a long-term trial operation to observe the display's performance under different working conditions. For instance, check if the display can operate stably after continuous running for a period; repeatedly turn the display on and off to inspect for any abnormalities during startup and shutdown. Meanwhile, pay close attention to the display's heat dissipation to ensure it will not malfunction due to overheating during operation.
c. After the acceptance is passed, fill out the installation acceptance report. Record in detail various information from the installation process, including installation steps, materials and tools used, problems encountered and their solutions, as well as the acceptance results. This report will serve as an important basis for subsequent maintenance and management.

3. How to maintain the sphere LED display in the later period?
3.1 Daily maintenance
Cleaning and Maintenance
To ensure optimal performance, regularly clean the spherical LED display using the following methods:
Surface Cleaning:
Use a soft, dry cloth or a specialized anti-static vacuum cleaner to gently remove dust, dirt, and debris.
Avoid: Wet cloths or chemical cleaners, as they may damage the display’s protective coating or LED modules.
Internal Dust Removal:
For accumulated dust inside the display, use a low-power blower or professional ESD-safe cleaning equipment.
Caution: Maintain a safe distance and angle to prevent damage to internal components.
Connection Line Inspection
Conduct routine checks on all wiring, including:
Power and signal cables for looseness, wear, or corrosion.
Wire conduits and channels for damage or degradation.
Action: Replace or repair any faulty connections immediately.
Display Performance Monitoring
During operation, observe the display for abnormalities such as:
Black screens, flickering, or distorted images.
Irregularities in brightness, color accuracy, or uniformity.
Response: If issues arise, power off the display immediately and perform troubleshooting.
Calibration: Periodically adjust brightness, color balance, and other settings via the control system to maintain optimal visual quality.
3.2 Regular maintenance
Hardware maintenance
Regularly check the hardware such as LED display module, control system, power supply equipment, replace or repair faulty components, and pay attention to model matching.
Software maintenance
Upgrade the control system software according to the manufacturer’s guidelines, manage the playback content, clean up expired files and data, and pay attention to legality and security.
3.3 Special situation maintenance
Maintenance in severe weather
In the event of severe weather such as strong winds, heavy rain, or thunderstorms, to ensure the safety of the spherical LED display, the screen should be turned off promptly and appropriate protective measures implemented, stay away from the outdoor and window. For example, for wall-mounted or hoisted displays, inspect the stability of the fixing devices and reinforce them if necessary. For outdoor-installed spherical LED screens, cut off the power supply to prevent damage from lightning strikes. Additionally, take waterproofing measures to prevent rainwater from seeping into the interior of the spherical LED display, which could cause faults such as short circuits.

4. Conclusion
This article has elaborated on the installation and maintenance of the sphere LED display in detail. If you are interested in the spherical LED display, please contact us immediately. If you are interested in the cost of sphere led display ,can shaped led display or any flexible led project, please contact us. As an LED display supplier with more than 12 years of experience, We will provide you with the best service.
